How to Lay Pavers
If quarantine has left you with time on your hands, and a hankering to create something beautiful and functional, then that outdoor entertainment area or path which has long been on your to-do list is a great place to start.
If this is your first-time paving, or if you need a refresher, this article is for you.
Planning Ahead
Choosing the Right Paver
First things first – what do you want your pavers to look like?
Take the time to do your research into the size, shape, colour and style of pavers available. Then consider your space, and how each of these factors will impact the overall look and feel. Now let’s consider functionality. Are your favourite pavers suitable for the space? For example, do you need non-slip pavers (particularly good for around a swimming pool or bbq), will your pavers be driven on or will you need salt-resistant pavers because you live near the ocean. Internet research is useful here, but we always recommend consulting an expert to ensure you get the right advice for your situation.
Consider the Space
Next think about the size and shape of your area, and the amount of time you have available to undertake this project. It goes without saying that larger format pavers are quicker to lay than smaller ones and can also create an optical illusion – making a small space look larger. However, please note that larger format pavers will require additional cutting.
Paving Patterns
There are many paving patterns that you can choose from including Herringbone, Stretcher Bond or Brick Bond, Diamond with flat header course, Diamond, Basketweave, Stackbond and varying combinations of these. You can also consider selecting different pavers to create contrast and add drama to feature elements such as the border or pattern.
What you’ll need
Materials:
- String Line
- Road Base
- Washed River Sand
- Marker/Spray Paint
- Cement
- Gap Sand
- Paver Sealer
Tools:
- Rubber Mallet
- Wooden Stakes
- Measuring Tape
- Spade/Shovel
- Spirit Level
- Screed Rail
- Screed Rail Set
- Plate Compactor
- Brick Saw
- Wheelbarrow
- Wooden Float
Installing the Pavers
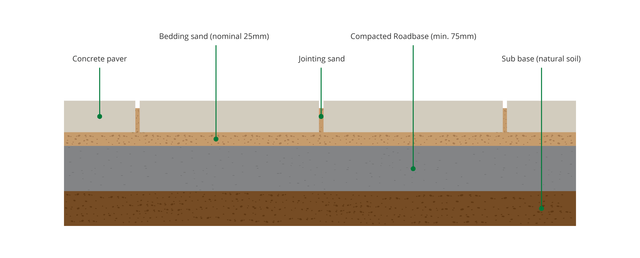
There are two options for installing the pavers. Flexible or rigid base installation. For DIY projects, the most common method used is flexible base installation, so this article will focus on this method. This illustration from the Australian Paving Centre shows the pavers being installed on a compacted road base and bedding sand, with jointing sand filling the 3mm gap in between pavers.
- Mark Area & Excavate
Mark out the area and determine the total square metre space of your project. Use this measurement to determine the number of pavers you’ll need.
Stake the ground on all corners and run string lines between them to indicate the desired level, making sure to excavate enough dirt to ensure the pavers lay flat with the surrounding area (no trip hazards).
- Road Base
Road base is used to build up areas, set levels and provide a strong layer to support the paved area. You will need to fill in the area with road base to a minimum 75mm level. The surface must be completely flat, but sloped to ensure that rainwater flows away from any buildings near the paved area. 15mm per metre of slope is recommended to achieve this.
NOTE: if the paved surface is against the side of the house, the pavers should be positioned BELOW the damp course and air vents.
- Compacting the Road Base
The ideal measurements for road base are as follows:
- For pathways, and entertaining areas – 75-80mm thick.
- For driveways – 100 – 150mm thick.
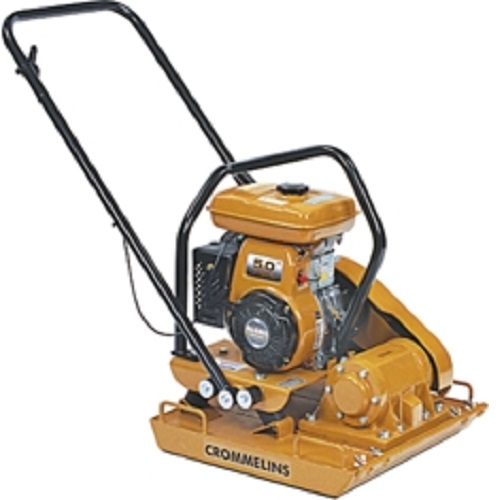
An 80kg Plate Compactor is most commonly used for large areas as the plate dimensions assist with greater efficiency as well as a more uniform finish. The weight of this plate compactor combined with its agitator achieve approximately 16Kn of compaction force which in most cases is sufficient for areas that will be walked over.
The 60kg Plate Compactor is lighter but its advantage is that is has a narrower plate than the 80kg Plate Compactor. It will compact with approximately 12Kn of compaction force and for this reason the compaction process may need to be done in smaller increments.
If you are tacking a driveway or areas that will hold vehicles, then the 140Kg Plate Compactor is the better option as it can achieve compaction to a depth of approximately 300mm.
- Screeding Sand
Ready to let your obsessive-compulsive nature loose?? The screeding sand step requires a fine touch, patience and finesse. Do not rush this step, because if you do and your sand is uneven, your finished job will be uneven.
Here’s some tips
- Use a Screed Rail set to accurately spread the bedding sand to the required level. Then use the Screed Rail to level the sand between the screed rails. Once level remove the screed rails and smooth of the sand with a trowel.
- Keep the thickness consistent across the entire area to ensure the pavers settle evenly.
- Set Up a String Line
Using the wooden stakes and string line, create a guide to ensure that the height of your finished project is even.
- Check for Square
Starting at the corner, or along an edge, place the pavers on the screeded sand in the chosen pattern. After laying the first row of pavers, thoroughly check everything as this layer will determine the height, angle and alignment. Mistakes here will grow from undetectable to REALLY obvious over the course of the project. Check that each paver is in a straight line, by ensuring each row is at a 90-degree angle to the one before. A quick tap with a trowel can help to correct any alignment errors.
Cutting may be required to achieve the desired look of the pavers or to fill odd shaped gaps made from fixed objects. The easiest way to cut pavers is with a Brick Saw or Brick, Block & Paver Saw. Both of these will produce accurate and clean cuts to maintain a professional look upon completion.
- Edging
If your project does not have a solid structure at its edge, you’ll need to add an edge restraint to stop the pavers from shifting over time. The most common form of edge restraint is to finish the unsupported pavers with a concrete edge strip. The edge strip can be either concealed (at least 10mm below the finished level), exposed or set into a concrete base.
- Pave Set
Sweep paving sand into the gaps by pouring the sand along the joins. This step secures the pavers position and minimises movement over time.
- Compacting
Our 80kg compactors are also available with a rubber base to compact the paved area into its final position.
- Hose Down
And finally, use a hose to remove the excess sand from your project. Let it dry and avoid walking on the pavers for 24-48hours.
As plate compactors, brick saws, screeds and screed rails go hand in hand for paving jobs, Centenary Hire offers these items a hire set. By combining all items into one hire as either a 60kg Paving Package or an 80kg Paving Package the overall hire cost is reduced and the job made much easier with the right equipment.